Quick Start
Get up and running with Securbase in a few minutes. This guide walks you through portal setup — account, organization, and API credentials — and then shows how to integrate Biomix components on web or native platforms.
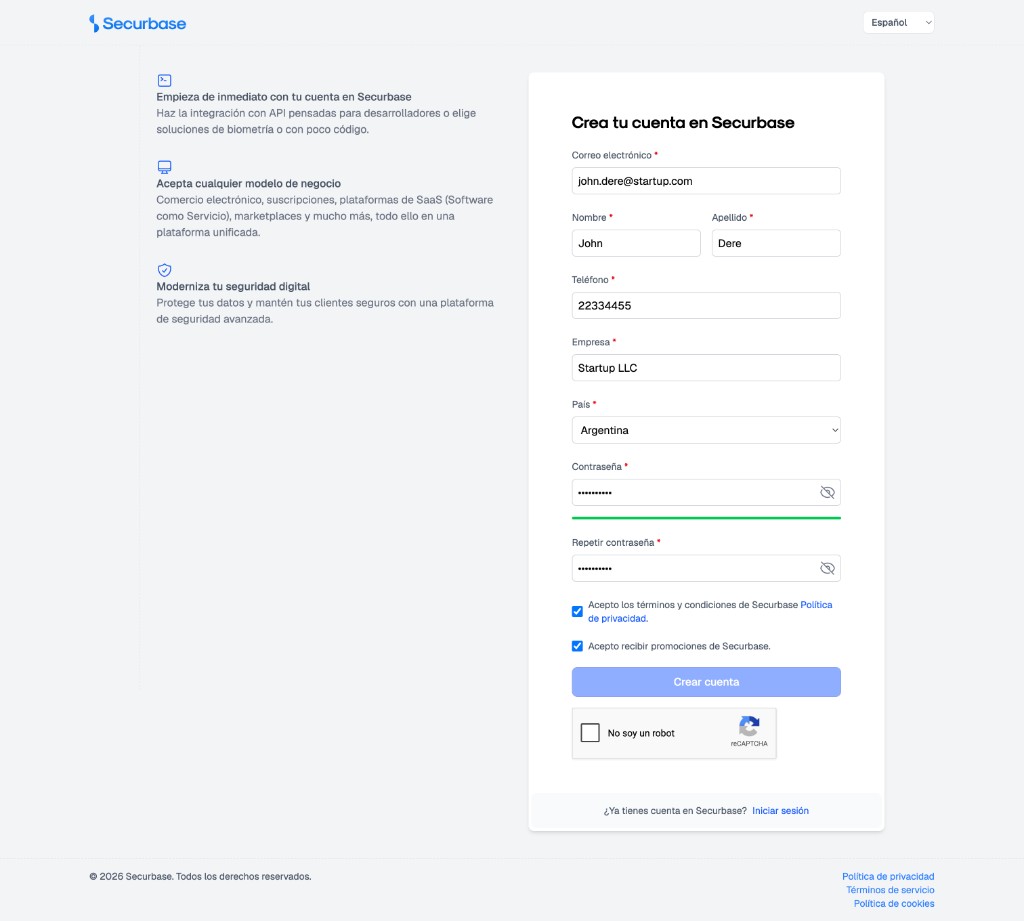
1. Create your account in the portal
Go to the Securbase portal and register a developer account. You will need a valid email address to confirm your account.
- Open https://app.securbase.com/signup
- Fill in your personal details, company name, and password
- Accept the terms and conditions and complete the reCAPTCHA
- Click "Create account" and verify your email from the confirmation link
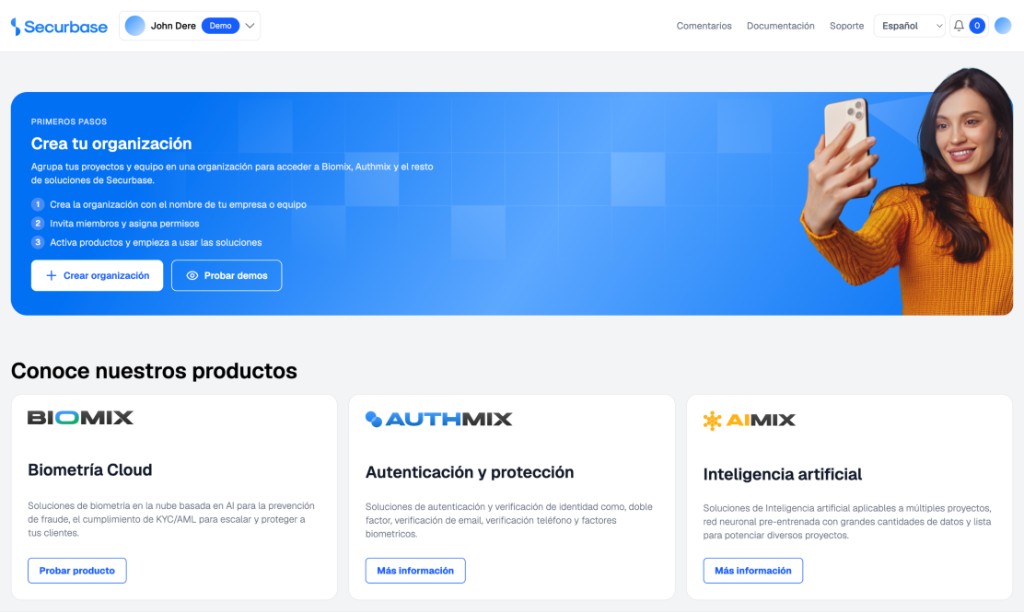
2. Create an organization
Once signed in, create an organization to group your projects, billing, and API credentials. Start from the Getting Started banner on the portal home.
Step 1 — Start from the portal home
- After signing in, open the portal home. You will see the "Getting Started" banner
- Click "+ Create organization" to open the creation wizard
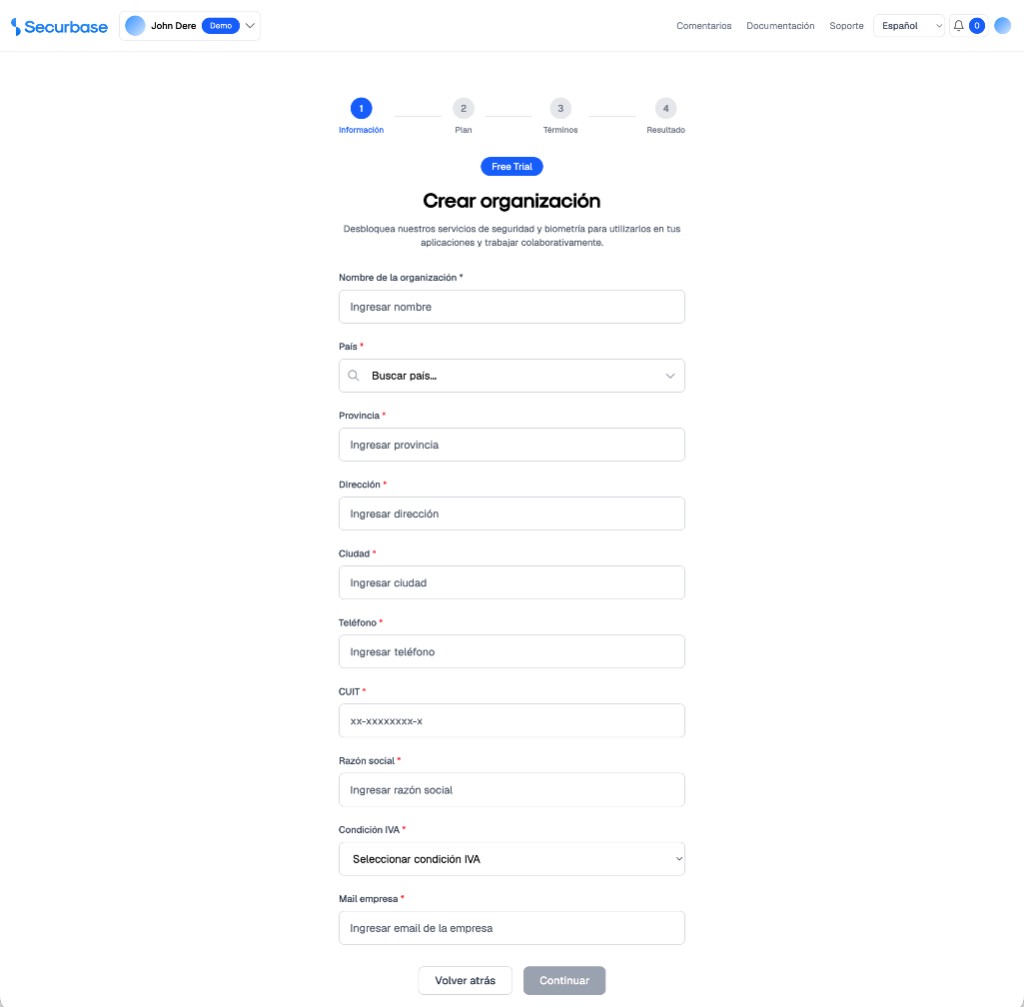
Step 2 — Start organization registration
- The wizard opens on step 1 (Information). Fill in your organization details
- Required fields: name, country, province, address, city, phone, tax ID (CUIT), legal name, VAT status, and company email
- Click "Continue" to proceed to plan selection
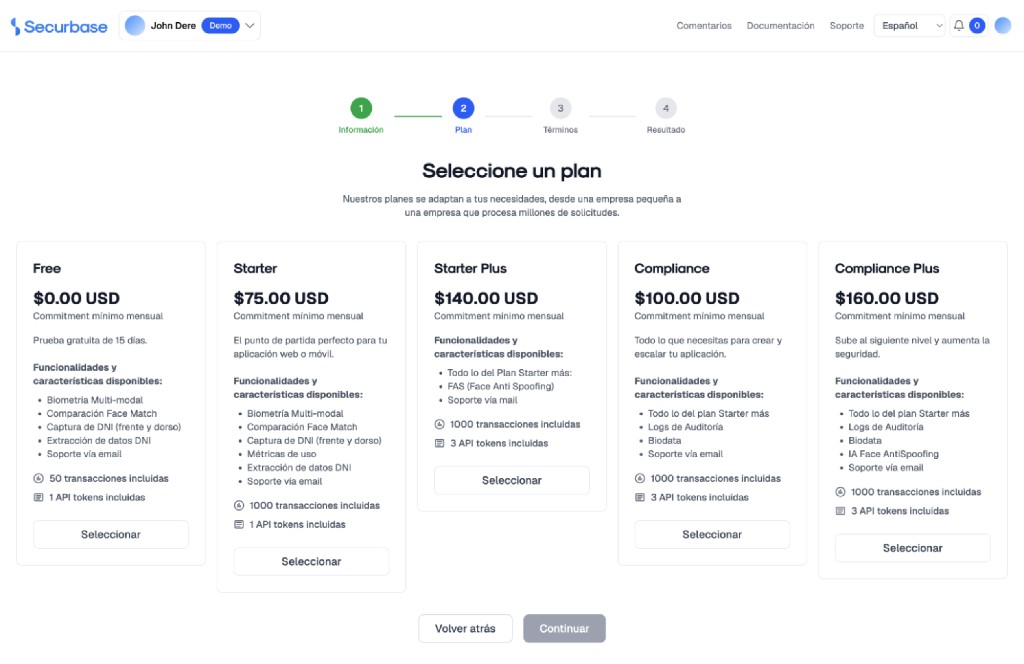
Step 3 — Choose a subscription plan
- On step 2 (Plan), review the available tiers: Free, Starter, Starter Plus, Compliance, and Compliance Plus
- Each plan lists included features, transaction limits, and number of API tokens
- Click "Select" on your preferred plan, then "Continue" to proceed to terms
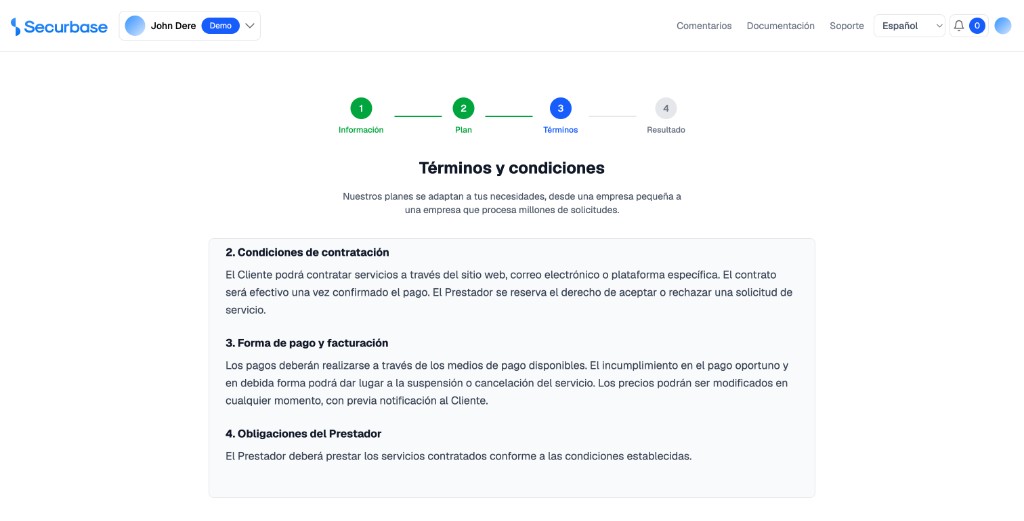
Step 4 — Accept terms and conditions
- On step 3 (Terms), read the service terms in the scrollable document
- Check "I accept the terms and conditions of the service"
- Click "I accept the terms" to create the organization and proceed to the result
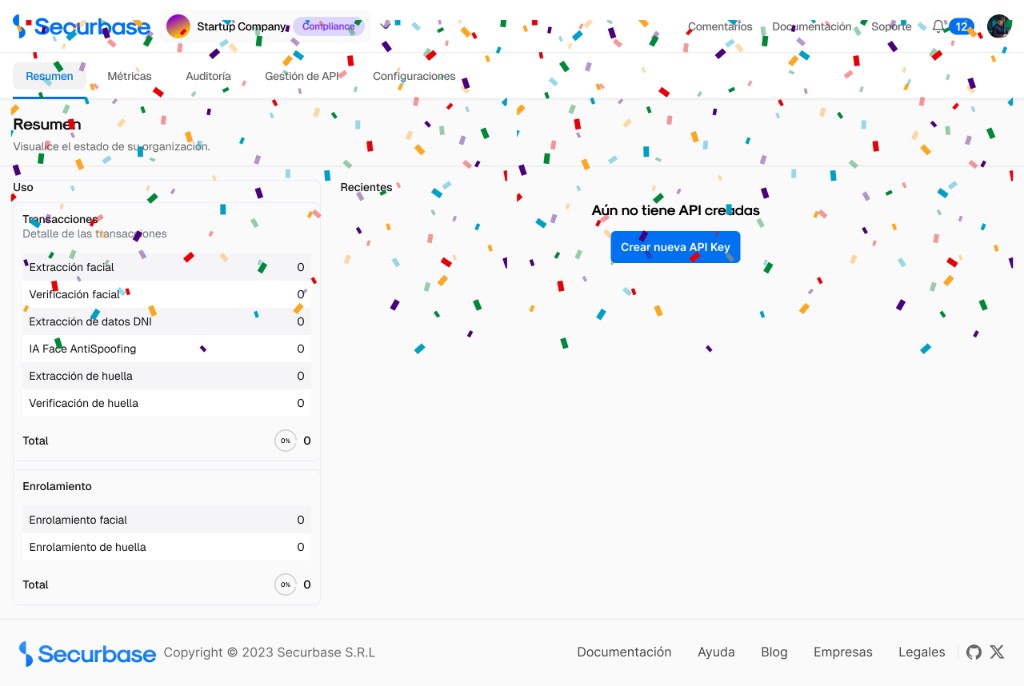
Step 5 — Organization created
- On step 4 (Result), the organization is created and you are redirected to the dashboard
- The Summary tab shows your plan, usage metrics, and recent activity
- Click "Create new API Key" or open the API Management tab to generate your integration credentials
3. Generate an API Token
Each organization manages its own API credentials. Create a token for each integration channel (web, mobile, staging, production).
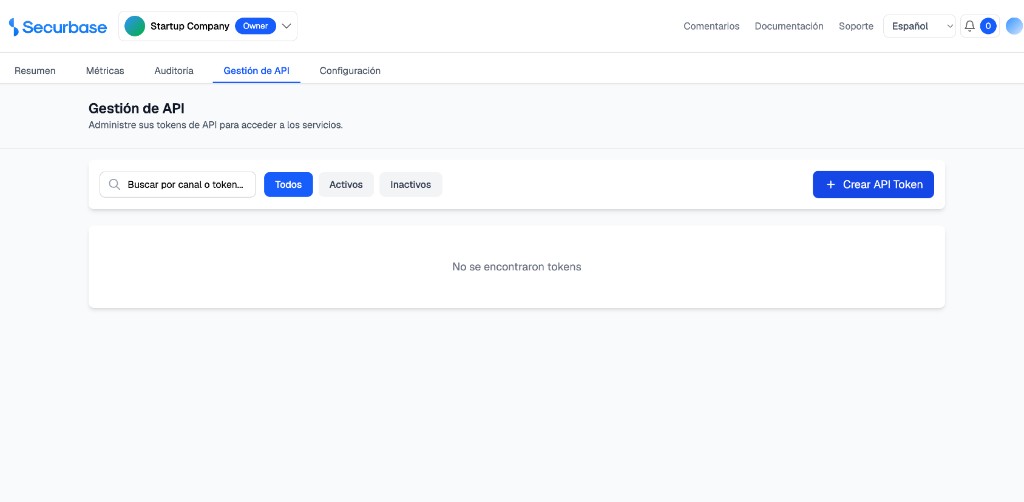
Step 1 — Open API Management
- From the organization dashboard, click the "API Management" tab in the top navigation
- You can also click "Create new API Key" from the Summary page — both routes open the same section
- The page lists your API tokens with search and status filters (All, Active, Inactive)
Step 2 — Name your API token
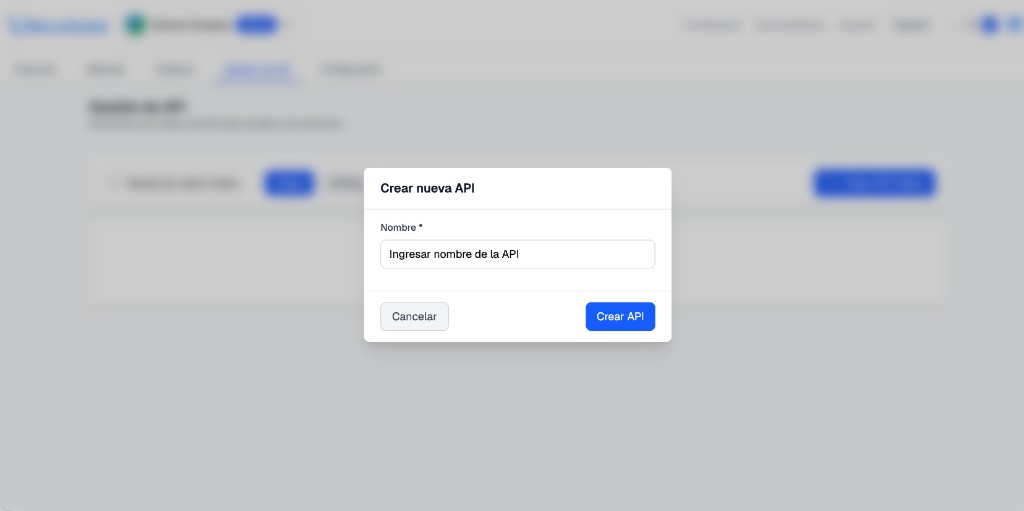
- Click "+ Create API Token" to open the creation modal
- Enter a descriptive name in the "Name" field (e.g. Production Web, Staging Mobile) — at least 3 characters
- Click "Create API" to generate the token and public key
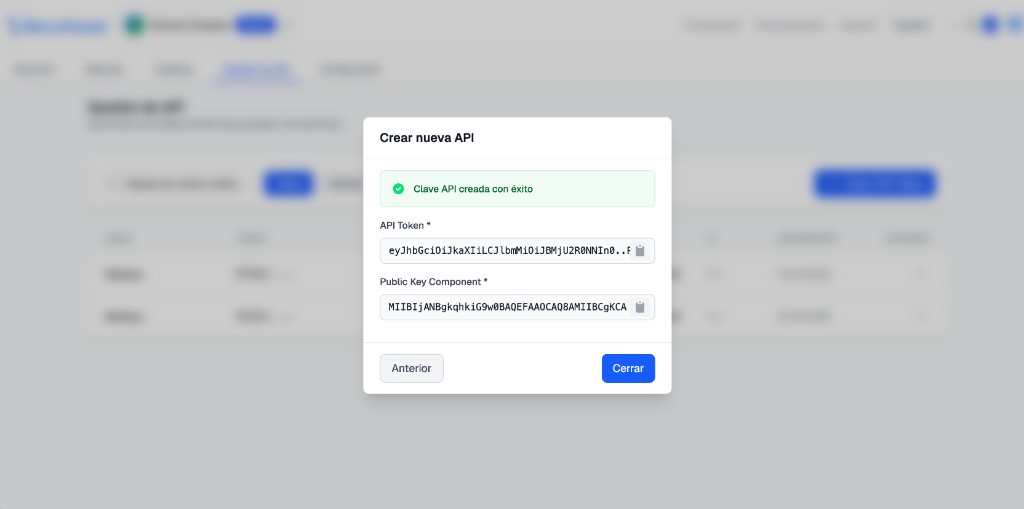
Step 3 — Copy your credentials
- After creation, the modal shows "API key created successfully" with your API Token and Public Key Component
- Use the copy button next to each field to copy both values — they will not be shown again after closing
- Store them securely: Public Key goes into Biomix components as publicKey; API Token authenticates backend calls
- Click "Close" once you have saved both values
4. Integration modes
With your Public Key and API Token ready, choose the integration path that matches your stack. All Biomix packages are published on GitHub Packages — configure your registry access before installing.
Web components
Embed Biomix directly in Angular or React web apps. Components run in the browser and use the device camera (HTTPS required). After capture, send the template or image to Securbase APIs using your API Token.
@securbase/biomix-dni-web-componentBiomix Face@securbase/biomix-face-web-componentBiomix Face (React)@securbase/biomix-face-react-componentIntegration flow
1import { Component, inject } from '@angular/core';2import { HttpClient, HttpHeaders } from '@angular/common/http';3import { BiomixDniCaptureComponent } from '@securbase/biomix-dni-web-component';4import { BiomixHeadlessInfo } from '@securbase/biomix-headless-angular-component';5import { ResultDNIUI } from './result-dni-ui.model';67@Component({8 selector: 'app-verificacion',9 standalone: true,10 imports: [BiomixDniCaptureComponent],11 template: `12 <lib-biomix-dni-capture13 [publicKey]="publicKey"14 [captureBack]="true"15 (dniTemplateReady)="onDniTemplateReady($event)"16 (processCancelled)="onCancelado($event)"17 (processCompleted)="onCompletado()">18 </lib-biomix-dni-capture>19 `,20})21export class VerificacionComponent {22 private readonly http = inject(HttpClient);2324 publicKey = 'TU_PUBLIC_KEY';25 authToken = 'Bearer TU_TOKEN';26 apiBase = 'https://api.example.com';2728 onDniTemplateReady(info: BiomixHeadlessInfo): void {29 if (info.status !== 'SUCCESS' || !info.template) {30 console.warn('Plantilla no disponible');31 return;32 }3334 this.http.post<ResultDNIUI>(35 `${this.apiBase}/portal/biometria/extraer-DNI-UI`,36 { template: info.template },37 { headers: new HttpHeaders({ Authorization: this.authToken }) },38 ).subscribe({39 next: (response) => this.onDniExtracted(response),40 error: (err) => console.error('Error al extraer DNI', err),41 });42 }4344 onDniExtracted(response: ResultDNIUI): void {45 if (!response.success || !response.data) {46 console.warn('Extracción fallida', response.error);47 return;48 }4950 const { frontImage, backImage, documentInfo, mrzRAW, pdf417Detected } = response.data;51 console.log('Frente base64:', frontImage);52 console.log('Dorso base64:', backImage);53 console.log('Número de documento:', documentInfo.documentNumber);54 console.log('MRZ:', mrzRAW);55 console.log('PDF417 detectado:', pdf417Detected);56 }5758 onCancelado(motivo: string) {59 console.warn('Proceso cancelado:', motivo);60 }6162 onCompletado() {63 console.log('Verificación completada');64 }65}
Native mobile (Android / iOS)
Use native SDKs for the best camera performance and offline-capable capture flows. Distribute via Maven (Android) and CocoaPods (iOS) from GitHub Packages.
| Platform | Biomix ID | Biomix Face |
|---|---|---|
| Android | com.securbase.biomix:biomix-dni-lib:2.0.0 | com.securbase.biomix:biomix-face-lib:4.0.0 |
| iOS | BiomixDniLib ~> 0.1.6 | BiomixFaceLib ~> 3.9.0 |
dependencies {implementation "com.securbase.biomix:biomix-dni-lib:2.0.0"// Face: implementation "com.securbase.biomix:biomix-face-lib:4.0.0"}
# Podfilepod 'BiomixDniLib', '~> 0.1.6'# Face: pod 'BiomixFaceLib', '~> 3.9.0'
Native libraries return capture results through platform callbacks. Send the resulting template or biometric data to the same Securbase API endpoints used by the web components.
Cordova / Capacitor
For hybrid apps built with Ionic or Capacitor, install the Cordova or Capacitor plugins. They wrap the native Android and iOS libraries and expose a JavaScript/TypeScript API.
- DNI Cordova:
@securbase/biomix-dniarg-cordova-component@2.0.0 - DNI Capacitor:
@securbase/biomix-dniarg-capacitor-component@2.0.0 - Face Cordova:
@securbase/biomix-face-cordova-component@4.0.0 - Face Capacitor:
@securbase/biomix-face-capacitor-component@4.0.0
See full guides at Biomix ID / Biomix Face.
You're all set!
What's Next
Continue with platform-specific setup and API reference: